帐前卒专栏

code, software architect, articles and novels.
代码,软件架构,博客和小说

执行:

1
git clone https://github.com/adieyal/sd-dynamic-prompts.git

出了问题,问题是:

1
2
3
4
5
6
7
8
9
Cloning into 'sd-dynamic-prompts'...
remote: Enumerating objects: 5626, done.
remote: Counting objects: 100% (600/600), done.
remote: Compressing objects: 100% (249/249), done.
error: RPC failed; curl 92 HTTP/2 stream 0 was not closed cleanly: CANCEL (err 8)
error: 906 bytes of body are still expected
fetch-pack: unexpected disconnect while reading sideband packet
fatal: early EOF
fatal: fetch-pack: invalid index-pack output

我感觉可能是下载的东西有点多,网速较慢?改成--depth 1

1
git clone https://github.com/adieyal/sd-dynamic-prompts.git --depth 1

结果问题依旧,仍然是:

1
2
3
4
error: 1783 bytes of body are still expectediB | 193.00 KiB/s
fetch-pack: unexpected disconnect while reading sideband packet
fatal: early EOF
fatal: fetch-pack: invalid index-pack output

尝试多次,仍然是这个问题,感觉这个和网速也没有太大的问题。继续查资料。修改git配置

1
git config --global core.compression 0

报错为:

1
2
3
Cloning into 'sd-dynamic-prompts'...
error: RPC failed; curl 16 Error in the HTTP2 framing layer
fatal: expected flush after ref listing

继续修改:

1
2
git config --global http.version HTTP/1.1
git config --global http.postBuffer 157286400

这个发现改完后,直接卡住了。不下载了。我继续修改:

1
2
3
4
apt-get install gnutls-bin
git config --global http.sslVerify false
git config --global http.postBuffer 1048576000
git config --global http.version HTTP/2

这次终于成功了。但是这种--depth 1的下载方法是没有history的。如果希望有history commit.则进去到刚下载的resposity中。
然后执行

1
git pull --unshallow

这样就能把整个修改历史都pull下来了。

1. prometheus 介绍

Prometheus 是一种开源的系统监控和警报工具,最初由 SoundCloud 开发,现在由 Cloud Native Computing Foundation (CNCF) 维护。它专门设计用于在动态环境中监控大规模的分布式系统。

以下是 Prometheus 的一些主要特点和功能:

  1. 多维数据模型:Prometheus 使用多维数据模型来存储时间序列数据,每个时间序列由指标名称和一组标签组成,使得数据可以灵活地被查询和聚合。
  2. 灵活的查询语言:PromQL 是 Prometheus 的查询语言,它允许用户对时间序列数据进行高级查询、聚合和操作,以生成自定义的监控指标和警报条件。
  3. 持久化存储:Prometheus 使用本地存储引擎来持久化时间序列数据,可以配置多种存储后端,包括本地磁盘、远程对象存储等。

2. prometheus 如何接入及示例代码

maven依赖

1
2
3
4
5
6
7
8
9
10
11
<dependency>
<groupId>io.prometheus</groupId>
<artifactId>simpleclient</artifactId>
<version>0.11.0</version>
</dependency>
<dependency>
<groupId>io.prometheus</groupId>
<artifactId>simpleclient_httpserver</artifactId>
<version>0.11.0</version>
</dependency>

指标项

  1. 计数器(Counter):

    • 用途:计数器用于累积值,通常用于表示累积事件的总数,如请求数、任务完成数等。计数器的值只能增加,不能减少或重置。
    • 示例:表示请求数的总数。
  2. 计量器(Gauge):

    • 用途:计量器用于表示可变值,它可以增加、减少或重置。通常用于表示动态变化的数据,如内存使用量、并发连接数等。
    • 示例:表示当前活跃用户数。内存占用数等
  3. 直方图(Histogram):

    • 用途:直方图用于度量观察值的分布情况,并提供一组用于汇总这些观察值的统计信息,如总数、均值、分位数等。
    • 示例:表示请求延迟的分布情况。
  4. 摘要(Summary):

    • 用途:摘要与直方图类似,也用于度量观察值的分布情况。不同之处在于,摘要提供一组用于汇总这些观察值的统计信息,如总数、平均值、标准差等。
    • 示例:表示响应时间的摘要信息。p99耗时统计等

指标项Counter

java代码示例

1
2
3
4
5
6
7
8
9
10
11
12
13
14
15
16
17
18
19
20
21
22
23
24
25
26
27
28
29
30
import io.prometheus.client.CollectorRegistry;
import io.prometheus.client.Counter;
import io.prometheus.client.exporter.HTTPServer;

import java.io.IOException;

public class Main {

private static final Counter requestsTotal = Counter.build()
.name("myapp_requests_total")
.help("Total number of requests.")
.labelNames("name")
.register();

public static void main(String[] args) throws IOException {
// Expose Prometheus metrics at http://localhost:9090/metrics
HTTPServer server = new HTTPServer(9090);

// Simulate a request and increment the counter
simulateRequest();

// Wait for server to stop (not needed if you have other shutdown mechanisms)
server.stop();
}

private static void simulateRequest() {
// Increment the requestsTotal counter
requestsTotal.labels("simulate").inc();
}
}

这代码中count就是一直增加,在未来图表中,可以用当前时间的数字减去1分钟前的数字,就能得到当前1分钟内请求数。

另外需要注意的是labelNames()函数和labels()函数。这两个是配合使用的。这里可以增加任意的维度。未来搜索或者作图可以更好地展现。

例如,我希望统计不同路径的访问请求。
那么我在labels('不同的path'), 这样就能分路径进行统计了。

如果你想统计不同的路径,不同的客户端请求数量。那么在注册Counter时,需要这样调用

1
2
3
4
5
6
7
8
9
10
private static final Counter requestsTotal = Counter.build()
.name("myapp_requests_total")
.help("Total number of requests.")
.labelNames("path", "clientType")
.register();

....
// 然后在需要增加计数时这样处理.
requestsTotal.labels("请求的URI", "iOS").inc();
requestsTotal.labels("请求的URI", "Android").inc();

指标项Gauge

1
2
3
4
5
6
7
8
9
10
11
12
13
14
15
16
17
18
19
20
21
22
23
24
25
26
27
28
29
30
31
32
33
34
35
36
37
import io.prometheus.client.exporter.HTTPServer;
import io.prometheus.client.Gauge;
import java.io.IOException;

public class MyApp {
static final Gauge myGauge = Gauge.build()
.name("my_gauge")
.help("Example of a Gauge metric")
.labelNames("label1", "label2") // 这里label非常重要。注意一定是有限集(可枚举,数量要有限制)
.register();

public static void main(String[] args) throws IOException {
// 启动 Prometheus HTTP 服务器,暴露指标数据
HTTPServer server = new HTTPServer(8080);

// 模拟应用程序中的指标更新
updateMetrics();
}

// 模拟更新指标数据
static void updateMetrics() {
// 假设这是您应用程序的一部分,定期更新 Gauge 指标的值
while (true) {
// 更新 Gauge 指标的值,可以基于应用程序的状态或性能指标进行设置
myGauge.labels("value1", "value2").set(42);

// 在这里进行其他业务逻辑和操作

// 休眠一段时间,模拟指标数据的定期更新
try {
Thread.sleep(5000); // 5秒钟
} catch (InterruptedException e) {
e.printStackTrace();
}
}
}
}

指标项Histogram

1
2
3
4
5
6
7
8
9
10
11
12
13
14
15
16
17
18
19
20
21
22
23
24
25
26
27
28
29
30
31
32
33
34
35
36
37
38
import io.prometheus.client.exporter.HTTPServer;
import io.prometheus.client.Histogram;
import java.io.IOException;

public class MyApp {
static final Histogram requestDuration = Histogram.build()
.name("http_request_duration_seconds")
.help("HTTP request duration in seconds")
.buckets(0.1, 0.5, 1, 2, 5) // 定义 Histogram 的 buckets
.register();

public static void main(String[] args) throws IOException {
// 启动 Prometheus HTTP 服务器,暴露指标数据
HTTPServer server = new HTTPServer(8080);

// 模拟应用程序中的请求处理
handleRequest();
}

// 模拟处理 HTTP 请求,并记录响应时间
static void handleRequest() {
// 假设这是您应用程序的一部分,处理 HTTP 请求并记录响应时间
while (true) {
long startTime = System.currentTimeMillis();

// 处理 HTTP 请求,执行一些业务逻辑

// 响应时间为处理开始到结束之间的时间差
long duration = System.currentTimeMillis() - startTime;

// 记录响应时间到 Histogram 中
requestDuration.observe(duration / 1000.0); // 将毫秒转换为秒并记录

// 在这里进行其他业务逻辑和操作
}
}
}

这里的buckets定义了不同桶
[0, 0.1), [0.1, 0.5), [0.5, 1), [1, 2), [2, 5) [5, 正无穷)
当耗时0.3秒被记录时,Prometheus将增加[0, 0.1), [0.1, 0.5)两个桶的值。

指标项Summary

1
2
3
4
5
6
7
8
9
10
11
12
13
14
15
16
17
18
19
20
21
import io.prometheus.client.Summary;
import io.prometheus.client.CollectorRegistry;

// 创建一个 Summary 指标
Summary requestLatency = Summary.build()
.name("http_request_duration_seconds")
.help("HTTP request latency in seconds.")
.quantile(0.5, 0.05) // 统计50%分位数,最大允许误差为 ±5%
.quantile(0.9, 0.01)
.quantile(0.99, 0.001)
.register();

// 在请求处理过程中记录持续时间
Summary.Timer requestTimer = requestLatency.startTimer();
// 执行请求处理逻辑
// 记录请求处理结束时间
requestTimer.observeDuration();

// 也可使用
requestLatency.observe(cost_in_seconds)

3. prometheus 检查是否成功

这其实要看设置的监听端口是多少。例如

1
2
3
import io.prometheus.client.exporter.HTTPServer;
...
HTTPServer server = new HTTPServer(8080);

那么上述代码的启动后,且有指标生成后,访问http://localhost:8080/metrics就能看到相应的指标。

4. 使用注意事项

  1. labels("value1", "value2")中的value1value2需要可数,不一定是枚举类型,但是数量是有限的。
  2. buckets(0.1, 0.5, 1, 2, 5), 这里的值越多,统计性能就越低,占用的内存就越大
  3. Histogram用于统计分布,Summary用来统计多少分位的数据。
  4. Counter每次放入的是inc()或者inc(number),放入的是增量。 Gauge每次放入的是当前的数据。

1. 下载油猴tampermonkey

首先去chrome webstore下载tampermonkey,就是众所周知的油猴。

这东西还是要从专门的渠道下载。因为如果你要做免登录脚本,那么用户名,密码不可能避免的需要被这些脚本知道。

如果是恶意制作的油猴插件,可能这些脚本就会被传送的特殊的服务器上去。用户名及密码就可能被拿到。

我这里最近在尝试学习油猴插件来制作某些网站的免登录脚本。

具体方法如下:

  1. 先找到要登录的网站
  2. 点击油猴的插件图标
  3. 选择create a new script...
  4. 进入后修改@name@match 一个是这个脚本文件的名字,一个是脚本会在哪个url下执行。 @match支持*通配符
  5. 然后在 // Your code here... 处编写代码

2. 记录一下各个网站的登录脚本

1. xxl-job-admin

1
2
3
4
5
6
7
$(":text")[0].value="your name";
$(":password")[0].value='your password';
$(":checkbox")[0].checked=true;
var loginButton = document.querySelector("button[type='submit']");
loginButton.click();


2. gitlab

1
2
3
4
document.querySelector('#username').value="your name";
document.querySelector('#password').value="your password";

document.querySelector('.btn-confirm').click();

3. grafana

1
2
3
4
5
6
7
8
9
10
11
12
13
14
15
16
17
18
19
20
21
22
23
24
25
26
27
28
29

var userId = 'your name';
var password = 'your password';
var userInput = document.querySelector('input[name^=user]');
var passwordInput= document.querySelector('input[name^=password]');

var loginButton = document.querySelector('.css-3coq9d-button');

userInput.value = userId;


userInput.blur();


setTimeout(()=>{


passwordInput.value = password;

passwordInput.blur();
// grafana 是非常奇怪的,这里需要两次click, 缺少任何一次都无法正常登录
setTimeout(()=>{

loginButton.click();
},1200);
},1200);

loginButton.click();

4. rancher

1
2
3
4
5
6
7
8
9
10
11
12
13
14
15
16
17
18
19
20
21
22
23
24
25
26
27
28
29

// 这个rancher 需要等待 document load 出来。也就是说他渲染界面有点慢。
setTimeout(() => {


var userInput = document.querySelector("div.labeled-input.edit input[type='text']");

var passwordInput = document.querySelector("div.labeled-input.edit input[type='password']");

var loginButton = document.querySelector("div.col.span-12.text-center button[type='submit']");

var user = 'your name';
var pass = 'your password';

userInput.value = user;

var event = document.createEvent('HTMLEvents');
event.initEvent("input", true, true);
event.eventType = 'message';
// 调度事件
userInput.dispatchEvent(event);

passwordInput.value=pass;

passwordInput.dispatchEvent(event);

loginButton.click();
}, 1000);

5. jenkins

1
2
3
4
5
6
document.querySelector("input[type='text']").value="your name";
document.querySelector("input[type='password']").value='your password';
document.querySelector("input[type='checkbox']").checked=true;
var loginButton = document.querySelector("button[type='submit']");
loginButton.click();

3. 总结

  1. 有些非常简单,只需要input组件value正确, 点击button就可以发请求,但有些就需要控制组件失焦, 还有一些需要模拟动作。
  2. 有些input非常容易获取到,可以通过id属性来找,有些就只能通过input子属性才能获取到。
  3. 每个网站的界面做的都大同小异,但是写脚本仍然非常头疼。登录这部分没有标准。

今天听说clash-for-windows这应用的主人删库跑路了。所以这里减少大家盲目search的时间。直接贴一下下载地址:
download

这个现在是不带病毒的,后续是否带病毒,就不知道了。怕带病毒的话,需要自行编译, 源码地址详见:
github地址

不过这个编译后的是否有后门就不清楚了。大家自行看源码吧。

既然来了,你在等待下载的时间要不要看看我的其他blog呀?

I update Hexo last stable version (6.3.0). And I change node/npm version to v18.18.0/9.8.1.
I found the changes in Hexo is quite big. I found images can not be displayed properly.

Old version image is like this:

1
2
3
4
<div align=center>
![](https://cdn.jsdelivr.net/gh/chilly/blog_cdn@master/images/4096/1.jpg)
**figure 1.1**
</div>

It can not be rendered properly.Then I changed the format of html like this:

1
2
3
4
5
6
7
8
<div align=center>

![1.jpg](https://cdn.jsdelivr.net/gh/chilly/blog_cdn@master/images/4096/1.jpg)

**figure 1.1**

</div>

Then it worked. I think it is hexo incompatibility issue.

Every time I add a centered picture and picture title, I write like the above code. It’s too complicated. If hexo support markdown template,m, I will write like this:

1
{% image_mid '/image/a.png'  'Figure1.1'  '1.jpg' %}

But there is no plugin in Hexo can implement this functionality. And theme _partials and _macro is njk can not used in markdown.

So I write my own plugin image-mid.

In node_modules/hexo/lib/plugins/tag, add new file called image_mid.js

1
2
3
4
5
6
7
8
9
10
11
12
13
14
15
16
17
18
19
20
21
22
23
24
25
26
27
28
29
30
31
32
33
34
35
36
37
38
39
40
41
42
43
44
45
46
47
48
49
50
51
52
53
54
55
56
57
58
59
60
61
62
63
64
65
66
67
68
69
70
71
72
73
74
75
76
77
78
79
80
81
82
83
84
85
86
87
88
89
90
91
92
93
94
95
96
97
98
99
100
101
102
103
104
105
106
107
108
109
110
111
112
113
114
115
116
'use strict';
const { resolve } = require('url');
const img = require('./img');
const { encodeURL, escapeHTML } = require('hexo-util');
/**
* Asset image tag
*
* Syntax:
* {% image_mid path [figure] [text] %}
*
* @param {string} path
* 1. support post_asset
* 1. support relative path like /images/a.jpg, will find in "source" folder => sources/images/a.jpg
* 1. support http:// and https://
*
* @param {string} figure
* Optional parameter, is image title which is below the image.
*
* @param {string} text
* Optional parameter, will be displayed when the image fails to load
*/

function getImage(id, path, text, ctx) {
var image = getImageFromAsset(id, path, text, ctx);
if (!image) {
image = getImageFromRelativePath(path, text, ctx);
}

if (!image) {
image = getImageFromInternalPath(path, text, ctx);
}

if (!image) {
throw new Error('can not render image tag. By path:', path);
}
return image;
}

function getImageFromAsset(id, path, text, ctx) {
const PostAsset = ctx.model('PostAsset');
const asset = PostAsset.findOne({post: id, slug: path});
if (asset) {
return img(ctx)([encodeURL(resolve('/', asset.path)), "'' '"+text+"'"]);
}
return null;
}

function urlConcat(base, path) {
if (base.endsWith('/')) {
if (path.startsWith('/')) {
return base.substring(0, base.length-1) + path;
}
return base + path;
}
if (path.startsWith('/')) {
return base + path;
}
return base + '/' + path;
}

function removeLastSlash(path) {
if (path.endsWith('/')) {
return path.substring(0, path.length-1);
}
return path;
}

function getImageFromRelativePath(path, text, ctx) {
var base_path = '/';
var image_path = null;
if (ctx.config.jsdelivr_cdn) {
if (ctx.config.jsdelivr_cdn.cdn_url_prefix) {
base_path = removeLastSlash(ctx.config.jsdelivr_cdn.cdn_url_prefix) +'@master/';
image_path = urlConcat(base_path, path);
}
}

if (!image_path) {
image_path = resolve(base_path, path);
}

return img(ctx)([encodeURL(image_path), "'' '"+text+"'"]);
}

function getImageFromInternalPath(path, text, ctx) {
if (path.indexOf('http://') > 0 || path.indexOf('https://') > 0 ) {
return img(ctx)([encodeURL(path), "'' '"+text+"'"]);
}
return null;
}

module.exports = ctx => {

return function assetImgMidTag(args) {
const len = args.length;
if (args.length <= 0) {
console.warn('image path is not set. args:', args, 'file:', this.full_source);
return;
}

var path = args[0];
var figure = '';
var text = '';
if (args.length >= 2) {
figure = escapeHTML(args[1]);
}

if (args.length === 3) {
text = escapeHTML(args[2]);
}

// Find image html tag
var image = getImage(this._id, path, text, ctx);
return `<div align=center><br/>${image}<br/><strong>${figure}</strong><br/></div>`
};
};

In file node_modules/hexo/lib/plugins/tag/index.js, add the following code.

1
2
tag.register('image_mid', require('./image_mid')(ctx));
tag.register('img_mid', require('./image_mid')(ctx));

Then in your markdown file. Write like this:

1
2
{% image_mid '/image/a.png'  'Figure1.1'  '1.jpg' %}

It will generate the html like this:

1
<div align="center"><br><img src="/image/a.png" class=""><br><strong></strong><br></div>

If you install jsdelivr_cdn plugin. And you write your _config.yml in Hexo root like this:

1
2
3
jsdelivr_cdn:
use_cdn: true
cdn_url_prefix: write your_cdn_root_path like 'https://cdn.jsdelivr.net/gh/<username for github>/<assets repo name>/'

The html will be generated like this:

1
2

<div align="center"><br><img src="https://cdn.jsdelivr.net/gh/<username for github>/<assets repo name>@master/image/a.png" class=""><br><strong></strong><br></div>

The effect is as follows:
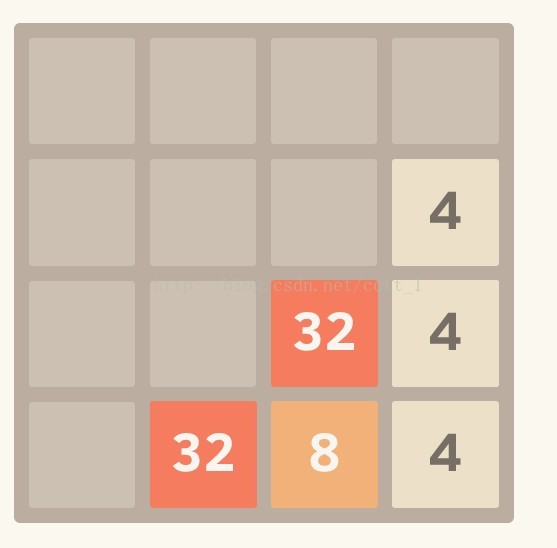

2.png
在4旁边生成4

The image tag is generated as CDN path.

This image_mid is support:

  • post asset path
  • relative path
  • http/https path
  • And post asset path and relative path can be generated as CDN path.

Use it and write your comments.

Before

Thanks for inviting me to answer the question: “Design a HashMap”. The description of the question is here:

1
2
Design methods like *put, get, containsKey, 
containsValue, remove* etc and answer the *complexity*.

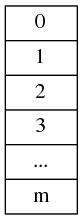
All of us knows “HashMap”. It is not “HashTable” see Figure 1.1. It means there does not exist a big array to store all of data.

hashtable.png

Figure 1.1 hashtable

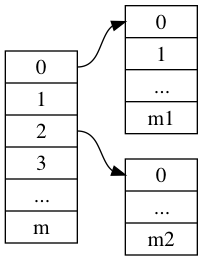
Compute hash(key) and put the value into array[hash(key)]. If array[hash(key)] is stored by other data, you must not put it into another slot. See Figure 1.2. You should create space for storing your new data.

hashmap.png

Figure 1.2 hashmap

Complexity

How to design it? We should have a hash function. And create an array/list called slot/bucket to store pointers/references which point to real data. Simple? But we should not implement the code immediately. Consider the functions and complexity first.

I assume complexity of hash function is O(hash). And the complexity of Operator is T(n). It means doing the operator n times. We look at put function. O(hash) often is done in constant time as O(1). But in special case like hash(Big Integer or Long String), the complexity of hash function will be O(x), x is related with the length of Big Integer or Long String. Em…Those are extreme cases, and we don’t care! So we just consider O(hash) as O(1).

1
2
3
4
5
6
put(key,value)

T(n) = O(hash) + O(create one space) + O(insert into new space) + T(n-1)
O(create one space) is O(1)
so
T(n) = O(1) + O(insert into new space) + T(n-1)

So what’s the O(insert into new space) ? I don’t know. If it is a single linklist, it will be O(1). We can insert the data into the head of linklist. But if we use other data structures? I will not discuss here. I should list other operaters first.

We assume our hash function is extreme good. The function will decentralize keys homogeneously. According to pigeon hole principle, the length of every space is no more than (N/m + 1). N is the total number of your data. m is the number of slots.

1
2
3
4
5
6
7
8
9
10
11
12
13
14
get(key)

T(n) = O(hash) + O(look up key from space) + O(return value) + T(n-1)
If key is bind with value, so you find the key, and you also find the value.
So complexity is no more than
T(n) <= O(hash) + O(N/m + 1) +O(1) + T(n-1)


if m >> n (m is much bigger than n), then
T(n) <= O(1)+O(1) + T(n-1) = O(1) + T(n-1)

if n >> m, then
T(n) <= O(1) + O(N) + T(n-1) = O(N) + T(n-1)

and containsKey

1
2
containsKey(key)
T(n) = O(hash) + O(look up key from space) + T(n-1)

Emm…The complexity of containsKey is similar with that of get(key). contain(key) is equal with get(key) ? Maybe.
and next is containsValue

1
2
3
containsValue(value)

T(n) = O(find value in all space) + T(n-1)

In the simple hashmap, there dose not exist value -> key mappings. so the complexity is O(n). We should iterator all values to find the target one.

And next is remove

1
2
3
4
remove(key)

T(n) = O(hash) + O(look up key from space) + O(remove key-value) + T(n-1)

If in put(key,value), we use single linklist and insert key-value into head every time. We find the key-value is O(N/m +1) and remove it is O(1). So

1
2
3
remove(key)

T(n) = O(N/m + 1) + T(n-1)

Optimize?

Can we use other data structures to optimize some operation? Yes. But we should consider other factors. like More complex, more bugs. and Effect of optimizing operation. For example, we consider the operation containsValue(value) is bad performance O(n). We can use another kind of hashmap structure to store value -> key mapping. So if we call containsValue(value), we will first call getKey(value) to get key, and then call get(key) to find the value. It sounds good! But how often we will call containsValue(value)? Maybe in every 1000 operations, only 1 operation is containsValue(value) and 999 are containsKey/put/get/remove. There is a little better effect vs more complex code. Which do you choose? And if you don’t optimize containsValue, will user think your application is too slow to use?

引子

这篇还是用中文写吧。我基本上没有看到中文的推导过程。当然英文的也各种缺失推导过程。有空的话再用英文写一篇(我肯定没有空)。

首先是lambda表达式。用过Python, Java, JS的,都应该知道。否则意味着你肯定没有好好学。

我是从国外的视频中看到lambda表达式和图灵机等价这一观点的。然后人家就进行了简单的推导。然而我根本就看不懂。我很怀疑我的英语水平,于是又仔细看了几遍视频,仍然不懂。我觉得我需要研究一下,因为视频中的很多推导都明白了。但是就有一步推导,讲解者说了这过程比较复杂,然后就带过了。我非常想知道这推导过程怎么来的。所以搜索了许多资料,加上自己的思考,写了下面的文字。

图灵完备

图灵完备是个什么意思?通俗的意思就是能实现正整数加减法,if判断跳转,while循环,以及可以构造简单数据结构的都称为图灵完备。图灵完备的语言无法处理停机问题。具备图灵完备的假象机器就是图灵机。你认为正整数加减法,if判断跳转,while循环很简单,所以你这个人也是图灵机的一种。

所有编程语言都会将图灵完备作为最基础的目标。你看比特币智能合约这么火,它也说自己是图灵完备的。这样看来图灵完备是检测这门编程语言是否能通用的前提。当然Java、Python、JS等等都是图灵完备的。

lambda表达式

在推导之前先看看什么是lambda表达式。

1
2
f(x) -> x
f(x,y) -> x

我认为以上都是lambda表达式。其中f,x都是变量,不光可以代表值还可以代表函数。f(x)代表一次f对x的调用。-> 是说最终得到x, 或者结果为x.

lambda表达式图灵完备推导

下面开始推导,首先的前提条件是赋值和等价这两个操作是最初存在的。为什么要提这个事情呢?因为不提这个事情就无法进行if的判断,也没有办法得到结果。其实图灵机的定义中其实也暗含了赋值和等价判断这两个基础操作。所有人都认为理所当然,只有我特意将这两个操作提出来。

推导之前我们必须有的基础操作

  • 赋值
  • 判断等价
  • 调用,使用**()表示,也可以使用.**表示

另外我们还应该清楚一件事,就是单参lambda完全等价于多参lambda表达式。在最初的1920+年Church这伟大的人物提出来lambda的时候就是使用的单参。但是我们为了推导方便,我故意使用多参。

问题: 多参为什么等价于单参lambda?

答:

1
2
3
4
5
f(x,y) -> z
t -> (x,y) 这里的括号无二义的时候可以去掉,就是 t -> x,y

所以 f(t) -> z
证毕

下面开始真正的推导:

首先定义True与False

1
2
False: x -> x  , 这样写你是不是更明白? (f,x) -> x
True: f,x -> f 这样写你是不是更明白? (f,x) -> f

然后就可以定义IF判断了。你看看False的定义是不是就是False ? f : x. True的定义是不是True ? f : x.所以False返回了x,而True返回f.我们将IF定义为多元组

1
2
3
4
5
6
IF(False,f,x) -> x
IF(True, f,x) -> f
同时认为
Fst(f,x) -> f 等同于IF(True,f,x)
Snd(f,x) -> x 等同于IF(False,f,x)
这其实就是投影操作。

下面我们再来定义正整数。False在我们计算机界经常被认为是0.所以我们0的定义就是

1
0: f,x -> x

正整数1的定义,我们认为调用了一次f,即

1
1: f,x -> f(x)

下面正整数2,3…,n的定义就是

1
2
3
4
2: f,x -> f(f(x))
3: f,x -> f(f(f(x)))
...
n: f,x -> f(f(...f(x)...)) 这里应有有n个f调用

我们下面为了更加方便我们这样简写:

1
2
3
4
2: f,x -> 2.f(x)
3: f,x -> 3.f(x)
...
n: f,x -> n.f(x)

我们下面来定义加法操作。例如n + m. 这个问题不好想,所以先想特例。例如5 = 2 + 3, 那么怎么得到5呢,就是5次函数调用:

1
2
3
5: f,x -> f(f(f(f(f(x))))) == f(f(f(2.f(x)))) == 3.f(m) == 3.f(2.f(x))  其中2.f(x) 替换成m,然后再替换回来。
替换一下
n+m: f,x -> n.f(m.f(x))

定义下乘法操作.例如n*m. 同样先想特例: 6 = 3 * 2. 怎么得到6呢?

1
6: f,x -> f(f(f(f(f(f(x)))))) == 2.f(2.f(2.f(x))) == 3.2.f(x)  其中2.f(x)替换为z所以就变成了3.z(x) 再替换回来就是3.2.f(x)

下面是定义n++操作,这个在数学上叫做Successor,所以我叫这个lambda为Succ. 其实从n到n+1是很简单。

1
2
Succ: n,f,x -> f(n.f(x))  就是多调一次f就行了

下面是定义n–操作,这个在数学上叫做Predecessor. 这个是最复杂的。我看视频就是没看懂这里。问题是怎么从n变成n-1。我知道n-1怎么变成n。那有没有方法将n-1带入公式,最后再同时消除呢?就这么干!当年Church可是苦想n天。我辈比较幸运,直接知道人家的想法了。看这篇文章的你们就更加幸运,因为我把所有被省略的推理过程也写出来了。

1
2
3
4
5
6
7
8
9
先定义: PSucc(n) -> (Snd n,Succ(Snd n))
那么PSucc((0,0)) -> (0,1)
那么我们对PSucc(0)做n次操作就是
n.PSucc((0,0)) = PSucc(PSucc(...PSucc((0,1))...)) 记住这里只有n-1个PSucc调用,因为其中一个PSucc((0,0))已经变成了(0,1)了
= (n-1, n)

那我们定义
Pred(n) -> Fst n.PSucc((0,0)) = n-1
Pred就是Predecessor

现在好办了,只要有了加减法,所有的一切操作就都好办了。

1
2
n-m的减法就是执行n--操作m次。
SUB(n,m) -> m.Pred(n)

下面再定义一些AND,OR,NOT就非常简单了

1
2
3
AND(a,b) -> IF(a,b,False) 这个意思就是如果a是真的,那就看b是不是真的。否则,那一定返回False.
OR(a,b) -> IF(a,True,b)
NOT(a) -> IF(a,False,True)

下面再定义while循环

1
WHILE(n,f) -> n.f

再来定义点简单的数据结构,例如链表, 这里还是学习了一下Lisp

1
2
3
4
5
6
7
8
9
> (cons 1 2)
> x
(1 . 2 )
这创建了一个头是1,尾是2的cons对象。
对cons的操作有两个,car及cdr,分别是读取cons的头和尾元素:
> (car (cons 1 2))
1
> (cdr (cons 1 2))
2

cons代表的是构建一个链表。 car代表是前一个节点,cdr代表的是后一个节点。那么我们用lambda表达式也写一个。

1
2
3
构造链表cons: cons(a,b) -> (a,b)
获取前一个节点car: car(a,b) -> a
获取后一个节点cdr: cdr(a,b) -> b

我们将0判断、False判断、null判断这三种操作认为是等价的。文章开始也说了,等价判断是先决条件。所以0判断一定是预先存在的。所以lambda表达式图灵完备了。

再说一点,图灵完备,意味着无法停机。停机证明不是本文的重点,不再证明。(对对对,就是笔者不会证明。你们随便吐槽)

总结

看了这篇文章你能学习到什么?你能证明1+2 == 3 ?还是会写链表了?lambda证明到底有什么用?根本就没有编程来的实在!你说的太对了。我也这样认为。那这篇文章到底有什么用?

就是为了装逼呀!!!

你看blockchain智能合约这么火,最后还不忘加上图灵完备字样。为啥?为了装逼呀~~~学计算机的这么多人,懂得图灵完备没有几个,懂得怎么证明图灵完备估计也没有几个。以后你们大可以吹嘘自己知道如何证明图灵完备。

看到一条微博,说:“太难了,我大脑停机了。” 就回复:“你竟然不是图灵完备的!!”

以后有谁再说**“我无法思考了”**,你们就接话:“你竟然不是图灵完备的!!”

对,以后谁在你们面前装逼说自己会图灵完备的证明,你们就接话:“我也会!!”

这才是这篇文章的正确打开方式。

起源

这次写写JAVA9的modular,俗称模块化。这个应该是Java9的最出彩的地方。之前Java的那个项目叫做Jigsaw。 为什么会有这个项目呢?原因在于之前Java使用package作为管理的。大家为了图省事,里面写的class都是public class。 也就是说包外都可用。大家都使用各种包管理工具ivy, maven, gradle啥的,A依赖C的1.0版本, B依赖于C的2.0版本。然后A,B又被自己的工程所依赖。C的1.0版本和2.0版本中有相同的类,不同的函数定义。见下图:

jarhell.png

图 1 运行时依赖不同版本的类

这就会导致JVM运行时不知道该用哪个类,这就是jar hell问题。不过jar hell还有许多种,这个只是比较常见的一种。

之前jdk自身的package也有许多,写着写着自己都搞不明白到底谁依赖谁了。然后大家就都需要依赖整个jdk的jar。但现在不一样了,只需要依赖一部分模块就行了。module是package的集合。而一个module可以依赖其他的module, 例如所有的module都依赖于java.base这个基础的module。

使用IDE,Intellij

说了这么多,不会用还是白搭。首先我们先用Intellij搭一个java9的工程。目录结构如下:

1
2
3
4
5
6
7
8
9
10
11
12
13
14
15
16
17
18
19
20
21
22
Project
|
module name
|
src
|
package name
|
class name
|
module-info.java
|
module name
|
src
|
package name
|
class name
|
module-info.java

这里有一个module-info.java。是写什么呢?首先我们将第一个module name写为one, 第二个module写为two. 第一个package是chillyc.info。第二个package name是info.chillyc.我们写一个最简单的Hello World代码,在代码里chillyc.info.Hello依赖于info.chillyc.World

Hello.java的代码

1
2
3
4
5
6
7
8
9
10
11
12

package chillyc.info;


import static info.chillyc.World.WORLD;

public class Hello {
public static void main(String[] args) {
System.out.println("chillyc.info.Hello" + WORLD);
}
}

World.java的代码

1
2
3
4
5
6
package info.chillyc;

public class World {
public static final String WORLD = "WORLD";
}

one的module-info.java

1
2
3
4
module one {
requires two;
}

two的module-info.java

1
2
3
module two {
exports info.chillyc;
}

呃,上面这些写成多个package,也不需要写module-info.java, 不是更省事吗?是是是,的确更省事,这些是为了整个java的生态环境。你一个人爽不叫爽,大家一起爽才行。

顺便一提,在IDE中Project上右键出来New…可以new出来新的module(自动带上了module-info.java)。 这个使用起来更加方便。我记得很久以前其实有package-info.java这个东西的。但是因为只是用来做文档声明的,大家嫌麻烦,都弃之不用了。我并不担心大家不用module-info.java. 因为这个东西还可以严格限制模块外可以调用哪些类。而且必须写模块依赖才行。所以如果你使用了module,那未来你一定有再次用到module的时候. 另外使用了module之后,你打成的最终jar应该更小巧。

仔细的研究一下module-info.java文件,里面有requires和exports。requires是依赖,exports是导出。这点倒是和JS很像。这两句任何一句缺失,你的程序编译时都会报错。错误类似:

1
2
3
4
5
6
只注释掉exports info.chillyc; 报错:
The module 'two' does not export the package 'info.chillyc' to module 'one'

只注释掉require two; 报错:
The module 'one' does not have the module 'two' in requirements

讲完了。你会用了吗?是不是很简单?…的确很简单。但是我觉得这依旧没有什么用。别人使用我的类的时候,如果我没有在module-info中exports出来,那他们要么重新写一个;要么让我改一下代码。

但是module的确让我们的工程代码更加清晰。不过怕就怕你把整个工程的package全部都exports出来,那这东西就没有什么用了。很多时候,我们封装好一个component,只希望暴露出少量的几个类。但是因为测试或者内部调用的方便,一般都会将class定义为public的。那这个时候使用module就可以很好的解决这个问题。

更实用的

对了,写点更加实用的。我们希望将各个module打成jar包,以后就可以单独使用某些module。这部分不能使用Intellij的IDE,因为它还没有支持。首先将Project的目录树变为如下的模样:

1
2
3
4
5
6
7
8
9
10
11
12
13
14
15
16
17
18
19
Project
|
src
|
module name
|
package name
|
class name
|
module-info.java
|
module name
|
package name
|
class name
|
module-info.java

然后开始敲命令了。

1
2
3
4
首先确定你的javac, java, jlink什么的是不是java9的版本。
$ mkdir mods
$ javac -d mods --module-source-path src $(find src -name "*.java")

执行完之后就可以看到mods里面存放了编译好的class文件。继续执行打包命令,注意jar是jdk9里的才行:

1
2
3
$ mkdir mlib
$ jar --create --file=mlib/[email protected] --module-version=1.0 -C modt/two .
$ jar --create --file=mlib/[email protected] --module-version=1.0 --main-class=chillyc.info.Hello -C modt/one .

执行jar文件:

1
$ java -p mlib -m one

这个问题在于我每次执行就需要带上一个mlib的文件。这个文件很容易被被人直接拿去了反编译了。现在有更好的解决方案了:编译成一个image.

1
2
3
$ jlink --module-path jmods:mlib --add-modules one --output oneapp
但是实际上上面这个要看你的Path是否正确,如果写成绝对路径应该像下面这样:
$ /Library/Java/JavaVirtualMachines/jdk-9.jdk/Contents/Home/bin/jlink --module-path /Library/Java/JavaVirtualMachines/jdk-9.jdk/Contents/Home/jmods:mlib --add-modules one --output oneapp

这样就有一个oneapp目录。这个目录里面你再也找不到你的[email protected]这个东西了。如果你要执行,敲下面的命令

1
$ bin/java -m one

通过如下命令可以看一下bin/java这里的modules

1
2
3
4
5
$ bin/java --list-modules
结果:
java.base@9
[email protected]
[email protected]

java.base其实就是java9的默认模块,所有模块都会依赖java.base。上面打包成oneapp中的jmods就是java的基础模块。我觉得这个东西还是比较有用的。另外bin/java中里面暗含了这些模块,所以也可以直接执行刚才的jar。

1
$ bin/java -jar [你的相对路径]/[email protected] 

结束

嗯。modular…其实也没有真正解决Jar Hell的问题。不过如果出现冲突,那么java9的提示会比较友好。另外没有一堆的classpath,这样ps命令时不会眼痛。编译成模块image这点对防止反编译还是有点用处的。但是这个image不能直接放到一个没有Java的环境中使用。那就是说,编译好的image, 仍然达不到开箱即用的效果。希望image这东西在Java10可以开箱即用,不再依赖OS和Jdk。(虽然官方文档说,编译出来的image文件可以放在没有JVM环境的地方使用。但是我Mac下编译出来的,为什不能在linux上使用呢?一点都不跨平台。这至少说明image依赖于OS…)

Intellij的官方教程
Jigsaw quick start
modular开发手册 2016年版
modular images

LP强烈要求用中文写。嗯,好吧,用中文写吧。

Flow 简介

今天试用了一下jdk9, 最主要关注Flow这个新增的功能。结果发现,这个Flow其实是一个final class,构造函数还是private,没有任何正常方法将其实例化。这个是新功能?我抱着学习的心态看了一下java doc. 发现主要是几个interface. Interface…都是接口,到底有没有实现?

然后不知道怎么查到了reactive-stream, 其实Java的JVM Flow就是按照reactive-stream的API规范写的。

reactive-stream是什么?就是反向压力流(back pressure),其实你称其为反向控制流也行。官方说法是:一个异步非阻塞反向控制流处理的标准。嗯,相当拗口。

什么是反向控制?这里还是抄袭一下别人的图吧。图的出处在这里

flow1.png

图 1 正常流处理

下面是反向的流处理:

flow2.png

图 2 反向流处理

看到了吧,反向的流处理图 2是Subcriber需要多少数据,就给多少数据。不要不给。正常的流处理图 1是管你要多少,我有多少给你多少。图1的问题就导致数据在管道里积压,或者在Subscriber里面积压。所以正常的流一般处理时要么数据就丢弃掉了,要么JVM就OOM了。所以反向的流好棒好棒的!

嗯,感觉也不是,因为有可能反向的流在Publisher的地方挤压了…其实你的程序性能不行,处理不完,积压不可避免。所以这反向的鬼东西有什么用呢?除非你的Publisher是根据你处理的数据的性能来生产数据。这听起来很酷,这很像当年教务系统的排队选课,以及魔兽世界中的等等等…其实就是处理性能不行,只能反推给最初的生产者。当然还有一种使用场景是消除峰值,当大量数据瞬间涌入时会造成整个系统崩溃。但如果你的系统在限定的时间内慢慢处理这些数据,还是完全没有问题的。这样就增加了系统的稳定性。

Java9其实只是将这个标准写入了JVM中而已。我顺便看了一下Publisher以及Subscriber的实现类,很多都是incubate包的(即实验中)。只有一个类是特别的存在:SubmissionPublisher。

Flow 使用

这个Flow使用起来,真的好麻烦。最初我知道Flow这个Feature的时候,我以为只需要将数据push到流里,然后有一个default的Consumer获取到数据。这个Flow自己给我搞定了反向控制。No,No,No. Java9啥都没有做。啥都需要你自己写。如果没有SubmissionPublisher,那你需要根据那几个Interface自己去实现。这是什么鬼,我是不是可以宣布我写了一个可以实现全世界所有功能的框架呢?我的框架就是下面这样的:

1
2
3
4
public interface Everything {

void doEverything();
}

是不是非常棒?! Java9宣称的Flow就和我上面宣称的没有啥区别,只是它的接口更多而已。好了,它还是给出了一个SubmissionPublisher。 我就先原谅它吧… 可是怎么使用呢?我再次抄袭了这边的blog的代码。我也不知道为啥变得这么厚颜无耻,不知脸红的抄袭,可能是跟腾讯阿里学的吧。

Publisher和Subscriber简单示例

1
2
3
4
5
6
7
8
9
10
11
12
13
14
15
16
17
18
19
20
21
22
23
24
25
public static class MySubscriber<T> implements Flow.Subscriber<T> {
private Flow.Subscription subscription;

@Override
public void onSubscribe(Flow.Subscription subscription) {
this.subscription = subscription;
subscription.request(1); //这里要使用Long.MAX_VALUE就会被认为获取无穷的数据。
}

@Override
public void onNext(T item) {
System.out.println("Got : " + item);
subscription.request(1); //这里也可以使用Long.MAX_VALUE
}

@Override
public void onError(Throwable t) {
t.printStackTrace();
}

@Override
public void onComplete() {
System.out.println("Done");
}
}
1
2
3
4
5
6
7
8
9
10
11
12
13
14
public static void main(String[] args) throws InterruptedException {
SubmissionPublisher<String> publisher = new SubmissionPublisher<>();

//Register Subscriber
MySubscriber<String> subscriber = new MySubscriber<>();
publisher.subscribe(subscriber);

//Publish items
System.out.println("Publishing Items...");
String[] items = {"1", "x", "2", "x", "3", "x"};
Arrays.asList(items).stream().forEach(i -> publisher.submit(i));
publisher.close();
Thread.sleep(20000);
}

主要的函数是:

1
2
3
4
5
6
7
8
9
10
11
// 反向控制获取数据个数。
//代码里两处request(1)都不能丢,否则数据无法正常获取
subscription.request(1)
// 发布数据,相当于数据输入
publisher.submit(i)
// 关闭publisher,没有该函数则Subscriber.onComplete()不会被调用。
publisher.close()
// 因为是异步的流处理
// 所以没能提供同步的接口,可以自己在Subcriber中加入同步策略
// 我这里简化了,如果你去掉这段代码,那你可能什么都看不到
Thread.sleep(20000);

运行结果如下:

1
2
3
4
5
6
7
8
Publishing Items...
Got : 1
Got : x
Got : 2
Got : x
Got : 3
Got : x
Done

Flow的Processor接口

Flow还有一个重要的Processor接口,这个其实就是函数变换。其实一般的函数变换操作都可以在Subscriber中实现,Processor并没有什么卵用。不过如果让我去定义接口,我仍然会给出Processor. 为啥?这样会防止别人来喷我…嗯,其实给出了Processor接口,一样有人来喷,例如我…

看下图就知道我在说什么了。竟然无图可盗了…

withProcessor.png

图 3 带有Processor的流

withoutProcessor.png

图 4 没有Processor的流

如果增加另外一个流,就可以完全实现Processor的功能。所以表达流的最小原语不应该存在Processor这东西。但是Reactive-Stream说:我的这个就是规范。那好吧,就加一个吧。不过增加Processor的好处在于:你可以只写一个流,里面有很多Processor。而不是写很多流,将Subscriber和Publisher混在一起写。虽然你已经在Processor中将Publisher,Subscriber混在一起写了…嗯…呃…总而言之,你一定要相信规范,Processor存在一定有它的道理。

下面也给一个Process的例子:是过滤用的Processor.(这段代码是我自己写的,在Oracle官方文档中本应存在这段代码,但是他们不小心忘记写了…忘记写了…我看到的官方文档最后由 Bob Rhubart-Oracle 于 2016-9-26 下午2:03修改,版本号为6):

1
2
3
4
5
6
7
8
9
10
11
12
13
14
15
16
17
18
19
20
21
22
23
24
25
26
27
28
29
30
31
32
33
34
35
36
37

public static class MyFilterProcessor<T,K extends T> extends SubmissionPublisher<K> implements Flow
.Processor<T, K> {

private Function<? super T, Boolean> function;
private Flow.Subscription subscription;

public MyFilterProcessor(Function<? super T, Boolean> function) {
super();
this.function = function;
}

@Override
public void onSubscribe(Flow.Subscription subscription) {
this.subscription = subscription;
subscription.request(1);
}

@Override
public void onNext(T item) {
if (!(boolean) function.apply(item)) {

submit((K)item);
}
subscription.request(1);
}

@Override
public void onError(Throwable t) {
t.printStackTrace();
}

@Override
public void onComplete() {
close();
}
}
1
2
3
4
5
6
7
8
9
10
11
12
13
14
15
16
17
18
19
20
public static void main(String[] args) throws InterruptedException {
//Create Publisher
SubmissionPublisher<String> publisher = new SubmissionPublisher<>();

//Create Processor and Subscriber
MyFilterProcessor<String, String> filterProcessor = new MyFilterProcessor<>(s -> s.equals("x"));

MySubscriber<Integer> subscriber = new MySubscriber<>();

//Chain Processor and Subscriber
publisher.subscribe(filterProcessor);
filterProcessor.subscribe(subscriber);

System.out.println("Publishing Items...");

String[] items = {"1", "x", "2", "x", "3", "x"};
Arrays.asList(items).stream().forEach(i -> publisher.submit(i));
publisher.close();
Thread.sleep(2000);
}

运行结果如下:

1
2
3
4
5
Publishing Items...
Got : 1
Got : 2
Got : 3
Done

重要的代码片段是:

1
2
3
if (!(boolean) function.apply(item)) {
submit((K)item);
}

这里的submit就是数据再发布,相信大家都能看懂,不再叙述。

Flow 性能测试

到底这个东西性能怎么样?我是不是随便写一个Flow的实现都比它快?如果它性能差,我按它这个规范写有什么意义?为了好看吗?
好吧。我自己用无锁队列实现了一下。功能就是简单的计数,看看各自的最强性能。

1
2
3
4
5
6
7
8
9
10
11
12
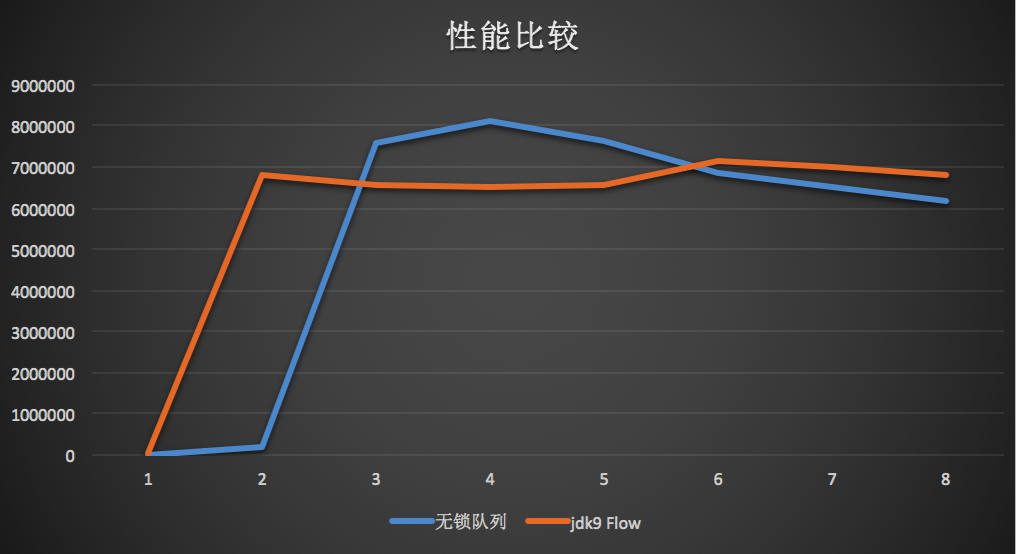
无锁队列执行结果:
class chillyc.info.speed.old.XFlow:27qps
class chillyc.info.speed.old.XFlow:171629qps
class chillyc.info.speed.old.XFlow:7586111qps
class chillyc.info.speed.old.XFlow:8095748qps
class chillyc.info.speed.old.XFlow:7640866qps
class chillyc.info.speed.old.XFlow:6845523qps
class chillyc.info.speed.old.XFlow:6516655qps
class chillyc.info.speed.old.XFlow:6191659qps
class chillyc.info.speed.old.XFlow:5742711qps
class chillyc.info.speed.old.XFlow:6657964qps
class chillyc.info.speed.old.XFlow:5720992qps

JVM jdk9 Flow执行结果

1
2
3
4
5
6
7
8
9
Concurrent.Flow 测试结果: 设置无穷索取, request(Long.MAX_VALUE)
class chillyc.info.speed.jdk9flow.Jdk9Flow:39688qps
class chillyc.info.speed.jdk9flow.Jdk9Flow:6798618qps
class chillyc.info.speed.jdk9flow.Jdk9Flow:6556238qps
class chillyc.info.speed.jdk9flow.Jdk9Flow:6506791qps
class chillyc.info.speed.jdk9flow.Jdk9Flow:6545895qps
class chillyc.info.speed.jdk9flow.Jdk9Flow:7129085qps
class chillyc.info.speed.jdk9flow.Jdk9Flow:7005827qps
class chillyc.info.speed.jdk9flow.Jdk9Flow:6818252qps

性能对比图:

性能对比

图 5 性能对比图

个人感觉前两次都可以忽略不计,无锁队列的实现中,前两次线程还没有完全启动,数据还没有完全填充。不过从另外一个侧面反映出jdk9 Flow启动效率非常高。我们除去前两次计算一下平均值。看到两者相差不大:无锁队列比jdk9 Flow平均快了17000+qps.

实验和数据量,buffer大小都有关系,变量太多,没有一一实验,并且两者的qps都是六七百万量级,所以我认为两者差别不大。JDK9的Flow实现的挺不错的,竟然能和我顺手写的性能差不多。我心中不由的赞叹一番。

Flow bug

因为测试了jdk9 Flow的无限索取时的性能。我想再测测每次取一个导致的最差性能(request(1))。结果就发现了bug.
测试输出如下:

1
2
3
4
5
6
class chillyc.info.speed.jdk9flow.Jdk9Flow:55296qps
class chillyc.info.speed.jdk9flow.Jdk9Flow:0qps

从结果上分析,经过一段时间之后,jdk9的Flow就无法处理数据了。这…真的能用吗?

结束语

本来应该带着虔诚敬畏的心态学习JDK9的…结果变成了吐槽大会了…罪过罪过,实在不该这样…顺便一提,jshell非常好用,tab功能提示很强大,就是我机器性能有点差,感觉很卡顿…

对了,不要以为我只会讨论jdk9…那是因为ReactJS 16发布的比较晚。

I will write an article to design Class Diagram. In before article, I draw some usecases and component diagrams.

4. Transform component diagram into class diagram

4.1 Mark noun as entity

I like OOM(Object Oriented Model). Because our world is built by things. And we describe those things as noun, like sky, bird, hand, clothes. In OOD(Object Oriented Design), things are object/class entities. So there is the equation:

1
things == noun == entities     (4.1.1)

Here, I will describe our system again. Clients will send message to our “Messager Service”. User will chat with someone. User can chat with many people in one chat room. Chatting is real-time. But if all clients of user are offline, system will send offline messages to one of user’s mobile client.

Why mobile client? Because web/pc client are hardly woke up. Emmm…Should we add a constraint? “User only use one client to login/chat.” Without this constraint, system should boradcast chat messages?

But here our key point is marking noun. I already marking them as “BOLD”. But client is not in “Server” rectangle in component diagram. I will draw client class diagram later.

class-init.png

Figure 4.1.1 init classes

4.2 Add relationship between entities

In Figure 4.1.1 Chatting class is the most important class. But Chatting means a chat message. So I change it to be “ChatMsg”. In ChatMsg class, there should be who send the message, who will receive it, and what’s the status of the message. Many users will receive the same ChatMsg Object. And one ChatMsg only contain one Message. If one ChatMsg is not exist, can the Message in it be exist? I think there should be strong relationship between Message and ChatMsg. And I call the relationship as “co-exist”. I draw solid diamond line between ChatMsg and Message. Other relationship with ChatMsg is not co-exist, but without User, the ChatMsg is meaningless. So I draw hollow diamond line between User and ChatMsg. Status is addition feature of ChatMsg. Without Status, we can not show chat status to our users. I draw arrow line between them. Now we draw Figure 4.2.1

class-init.png

Figure 4.2.1 init classes 2

Emmm…Does ChatRoom relate with ChatMsg? Yes. We consider users chat with each other in one chat room. When one chat message generated, the system will send it to the users who are in the ChatRoom. So I put Collection into ChatRoom. So here it is:

class-init.png

Figure 4.2.2 init classes 3

4.3 Think twice

Here, another problem should be considered. If we join/leave ChatRoom, the users of ChatRoom will be changed. Can we see ChatMsg even if we leave the ChatRoom? If the status of ChatMsg is sent, and then someone join the chatroom, should the ChatMsg be delivered to him? Can new comer see old ChatMsgs?
There are many requirements:

  1. new comer can see old chat messages. But someone quit the room, he can not see any chat messages be occurred in the room.
  2. new comer can not see old chat messages. And someone quit the room, he will see nothing chat messages.
  3. new comer can not see old chat messages. But even someone quit the room, he can see chat messages before he left in any time.

And there will be corresponding solutions too!

  1. Do nothing, the class digram supports the requirements 1.
  2. If ChatRoom is changed, we log it. So ChatRoom should contain version. The solution also supports requirement 1 and 3. But the performance of the system will be lower than 1 or 3.
  3. We store Collection<User> in each ChatMsg Object, and Collection<User> is only the snapshot of ChatRoom. It seems there is no relationship between ChatMsg and ChatRoom. And it will cost more spaces (memory/disk) than 1 or 2.

I will choose solution 2. The solution can adapt many requirements, and it stores the relationship between ChatRoom and ChatMsg. And I fill more field of Class Message and User. I call “ChatRoom history” as “ChatRoomSnapshot”. When ChatRoom is changing, the system will generate ChatRoomSnapshot to store old ChatRoom. The id of ChatRoomSnapshot and related ChatRoom must be the same. So the relationship between ChatRoom and ChatRoomSnapshot is weak. I just draw a line between them. In Message, I prefer JSONObject as its content.

class-init.png

Figure 4.3.1 init classes 4

All of above are our system “Server” entities. Is it enough? Those entities seem like static or immutable. And in component diagram, there are many components. Which component is related with the class diagram? The answer is none. Figure 4.3.1 only draw basic entities. Those entities will be used in each components. And now, I will draw details of each component, and “give life” to those entities.

0%